Showing posts with label covered buttons. Show all posts

Sunday, July 7, 2013

Banana Circle Skirt


i was in the mood for a new skirt and knew i wanted to go to my infamous style, the simple circle skirt. i went to Hancock Fabrics one day and wandered around the store for quite some time trying to find a fabric i wanted to use.  i eventually went with this awesome bright yellow twill.  you know i love my bright colors!! the actual color name on the bolt was banana!  so i got my fabric, zipper, bias tape, and yellow buttons and set out back home to begin sewing.


my original plan was to make a half circle skirt, but with the fabric being 60" wide, and then i bought 1 1/2 yds, i was able to get a full circle skirt out of it!  it was actually one whole circle, but then i did one side seam to put in the zipper.

for the waistband i did a simple rectangle longer than my waist width so it would overlap.  i then did a simple button for the closure.  i was super excited about the button because it was so cute with the little white dots detail on it!

for the skirt hem, i decided to do a bias tape faced hem with yellow bias tape instead of doing narrow hem.  i only bought one package of yellow bias tape and didn't end up having enough, but luckily enough it was only a small section that lacked.  so i added some white bias tape to the open section.  also, i bought double fold bias tape instead of single fold, but worked it out by simply ironing the middle fold of the bias tape out.


once my skirt was finished i was going to just keep it the solid yellow, but decided to add another little touch and do round, pleated patch pockets.  for the pockets i did an inverted box pleat in the center and a regular pleat on either side of the box pleat.  this tutorial from guthrie & ghani was great in helping me figure out how to make the pattern for the pocket.


to attach the pockets i fanned the skirt out completely flat and measured meticulously to make sure they were even.


i also added black piping and a self-covered fabric button.  i LOVE doing fabric covered buttons!!!


even though i planned to make a 1/2 circle skirt i'm glad i did the full circle because i love how the skirt came out.  i also made it longer than what i thought i needed then cut off about 2" or  3".  this way i could be positive it wouldn't be too short.  can't wait for my next circle skirt!!


the skirt is absolutely fabulous for twirling in too!  i started taking timed pictures of me to demonstrate the great twirl ability...


...then realized i could do an action shot setting with the timer.  so no more blurry pictures!  and on to the barrage of twirling pictures.  i was having a lot of fun twirling, if you couldn't tell!


Thursday, May 10, 2012

Raspberry & Teal Retro Beauty

not only have i made a new top and new skirt this time, but i've made an entirely new outfit...and i must say that this is the cutest outfit i have in my closet now =)  so, if you've read my previous post, you know that i've been accepted to O'More College of Design where i will be getting a degree in fashion design.  well, every year the school puts on a fashion show showcasing the designs of select juniors and seniors.  as an admitted student i was invited to attend the show and i couldn't be more excited!  this is why i needed a new outfit.

so, for my skirt i reverted to my favorite design...the circle skirt.  i saw this gorgeous polka dotted stretch cotton fabric at Hancock Fabrics a while ago, but continued to pass it by.  when this opportunity arose i knew exactly that i was going to use it.  i mean. it just screams vintage and retro! 

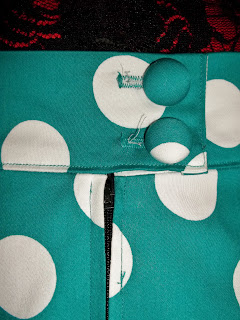
in making this skirt i actually used some new techniques other than the ones i typically do for my circle skirts.  for this 1/2 circle skirt i inserted a side zipper.  for the waistband you will notice i strayed away from my usual elastic waistband and did a real waistband, featuring two fabric covered buttons-which i covered myself-for a tight fit.  another change was to the hem.  usually i do a bias tape hem so that i don't have to go throught all the trrouble of trying to do a hem on a circle...b/c it can be a pain.  doing the narrow hem actually was fairly easy.
i absolutely love how this skirt turned out and next on the agenda was to make a top that complimented the skirt.  for the top i went to Joann Fabrics.  while perusing through the red-tag fabric section i spotted this raspberry-colored chiffon.  in my head i envisioned a sheer chiffon top being paired with the skirt, so i knew this was the fabric.  i had also bought this great pattern from Simplicity a while back and knew this style was what i wanted.  i love the vintage feel the ruffle adds to the top.  for those of you that have done/do quite a bit of sewing, you probably just read this section and thought, "chiffon? nooooo! what is she thinking?!"  well, i did some research online about sewing with chiffon and found all the horror stories.  i was a little afraid before starting the project but decided to continue on.  since i used chiffon i did have to do some tweaks.  like for the seams, b/c chiffon frays easily, i used french seams. and all hems and edges, unless encased, are double turned.  doing those little changes did add extra time to the process, but i knew if i didn't do them i would be very unhappy once the top was finished.  even with the difficulties i went through in sewing the top it turned out great and looks gorgeous with the skirt.

now, i am ready to put my best foot forward at the fashion show tomorrow night and watch all the amazing student designs head down the runway!