Showing posts with label embroidery. Show all posts

Thursday, May 28, 2015

Back At Last!

I know, I know, yet again I have neglected my dear readers.  This past school year was a lot, though.  This was the year that I created my own 6-piece collection and showcased it at my school's annual fashion show.  More on that after I talk a little about some projects I did before all that!

First up is this adorable little pair of overalls I made for a friend who had a baby boy in October.  His name is Finnley and he is the cutest thing ever!  The pattern I used for his overalls was Simplicity 2459.  I found this cute plaid on sale for an awesome price when I was still working at Hancock Fabrics.  I used bright orange buttons on the sides to pull out the orange stripes, I did turquoise buttons on the inside where the straps secure, and this was also my first time ever using snap tape.  While I haven't become best friends with the snap tape, I must say it wasn't that hard to work with.


I believe I made these overalls in a size 12 months, so that way he would be able to wear them when he's a little older and possibly still be able to grow into them.  As another special gift for Mr. Finnely, I made a custom embroidery hoop for his room.  I found out his nursery was done in vintage airplanes, so I chose to do that for his hoop.  I love making personal gifts for people, and this piece was a big hit with mom and dad!

I was on a big hand embroidery kick at the time and was making embroidery hoops for a lot of friends.  Like this hoop I made for one of my best friends at school.  She is a huge Beyonce' fan.  Enough said. Lol  Needless to say she loved it!

In addition to my embroidery kick, I had gotten into cross stitch.  I had never cross stitched before, but started with some cute patterns from The Frosted Pumpkin Stitchery.  I you love cross stitching, and have not experienced all the kawaiiness (cuteness) of The Frosted Pumpkin Stitchery patterns, then you are truly missing out!  Being that I was a first-time stitcher, it was great that their patterns are easy to understand, easy to follow, and explain everything so clearly.  I think I had already bought 2 patterns when I decided to buy their Woodland Sampler to stitch up for a friend who loves anything woodland.

This pattern is a 12-month one, which means it originally came out as a block-per-month.  In total I think it took me about 3 or 4 months to stitch it up.  I was on a mission to have it finished as a Christmas present for her.  Once I had it stitched up, I decided to make a cute little pillow for her...because y'all, she has a real pillow addiction!  For the backing of the pillow and as a little border around the front, I used an awesome batik cotton I found at fabric.com.


Well, now we've made it to 2015.  Spring semester!  The semester of the fashion show!  For my collection, I chose to do a little girl's line.  I've discovered that that is what I want to do with my life.  Be in the childrenswear industry, whether as a designer at a company or have my own line.  I will also be doing a little girl's line for my senior collection.  Before I get too much into my collection, though, I must show off my dress I made for my school's Pantone Cocktail Party.

We were told to come dressed as a Pantone color of the year, and I chose 2001's Fuchsia Rose.  For my dress I used New Look 6143 and the fabric is a stretch cotton sateen I got on sale at Fashion Fabrics Club.  The polka dot tulle I found at Joann's.

My friend Hannah, pictured with me, also made her outfit.  She drafted the pattern for the top and skirt herself.  She went as Pantone's Emerald of 2013.  

This picture is a great representation of our friendship. Lol

Now, at this point it was just a few short weeks to the fashion show.  All garments are complete, we're finishing up accessories, and preparing for our jury presentations.

As part of the junior class requirements, we had to make every single piece of clothing, and any accessories we used had to be made by us or altered significantly in some way.

My collection name is Lil' Miss RockaBetty, and it is for little girls 3-7 years old.  My inspiration was the 1950s Rockabilly culture, that is still prevalent in today's time.  I wanted each piece to be cute and functional.  All my fabrics are 100% cotton.  My 6-piece collection included:
1. a peplum top with a pair of stretchy denim jeans
2. a dress with pleated skirt and 3/4 length sleeves
3. a two-tone gingham skirt with a sleeveless top
4. a polka dot sleeveless top paired with gingham shorts, feat. removable suspenders
5. a sleeveless polka dot dress with red pearl snaps down the front
6. a cherry print romper with red pearl snaps in the front and adjustable shoulder ties

My accessories included a picnic basket I wove with gingham ribbon and I made a gingham liner for it.  I made pinwheels, a reversible hair tie, a purse I covered in fabric-inside and out, and a headband featuring giant cherries I made from styrofoam balls and paperclay.  I also made a cherry necklace from small styrofoam balls and paperclay.  The piece I love the most, though, is the cherry purse I made.  I used brown circular boxes that I cut and covered in vinyl, glued together, and lined with gingham.  I also cut out some foam leaves and added a brown leather cord strap.


I am so pleased with how everything came out and my little models made each piece even more adorable.  These little girls are so stinkin' cute and I am so proud of them!  It was so great seeing a collection that I produced go down the runway and I can't wait until next year for my senior one!


Well, that's all the updates I have for now.  You won't have to wait months to hear from me again, though.  May 30th I'm heading to New York for a week with other girls from the fashion department at my school and our Fashion Dean.  It is our required travel trip through the school, and as part of the class we have to blog daily about our time there.

So, next time you hear from me I'll be updating form the Big Apple!  Until next time y'all!

Sunday, October 12, 2014

Blog Catchup: End of Spring 2014 Semester & Summer Sewing

wow, i can't believe how badly i've neglected my blog and updating my wonderful readers!!  I could've updated over my summer break, but i'm a Professional Procrastinator (lol) and didn't feel like it.  last semester was absolutely insane!  there were so many nights where i didn't sleep a wink and by the end of the semester i just wanted to cry!  the main culprit of the sleepless nights was my final gown for my Draping class.  it turned out beautifully but the process was kind of a pain.  more about that later on but first i'll post the projects i completed before then.

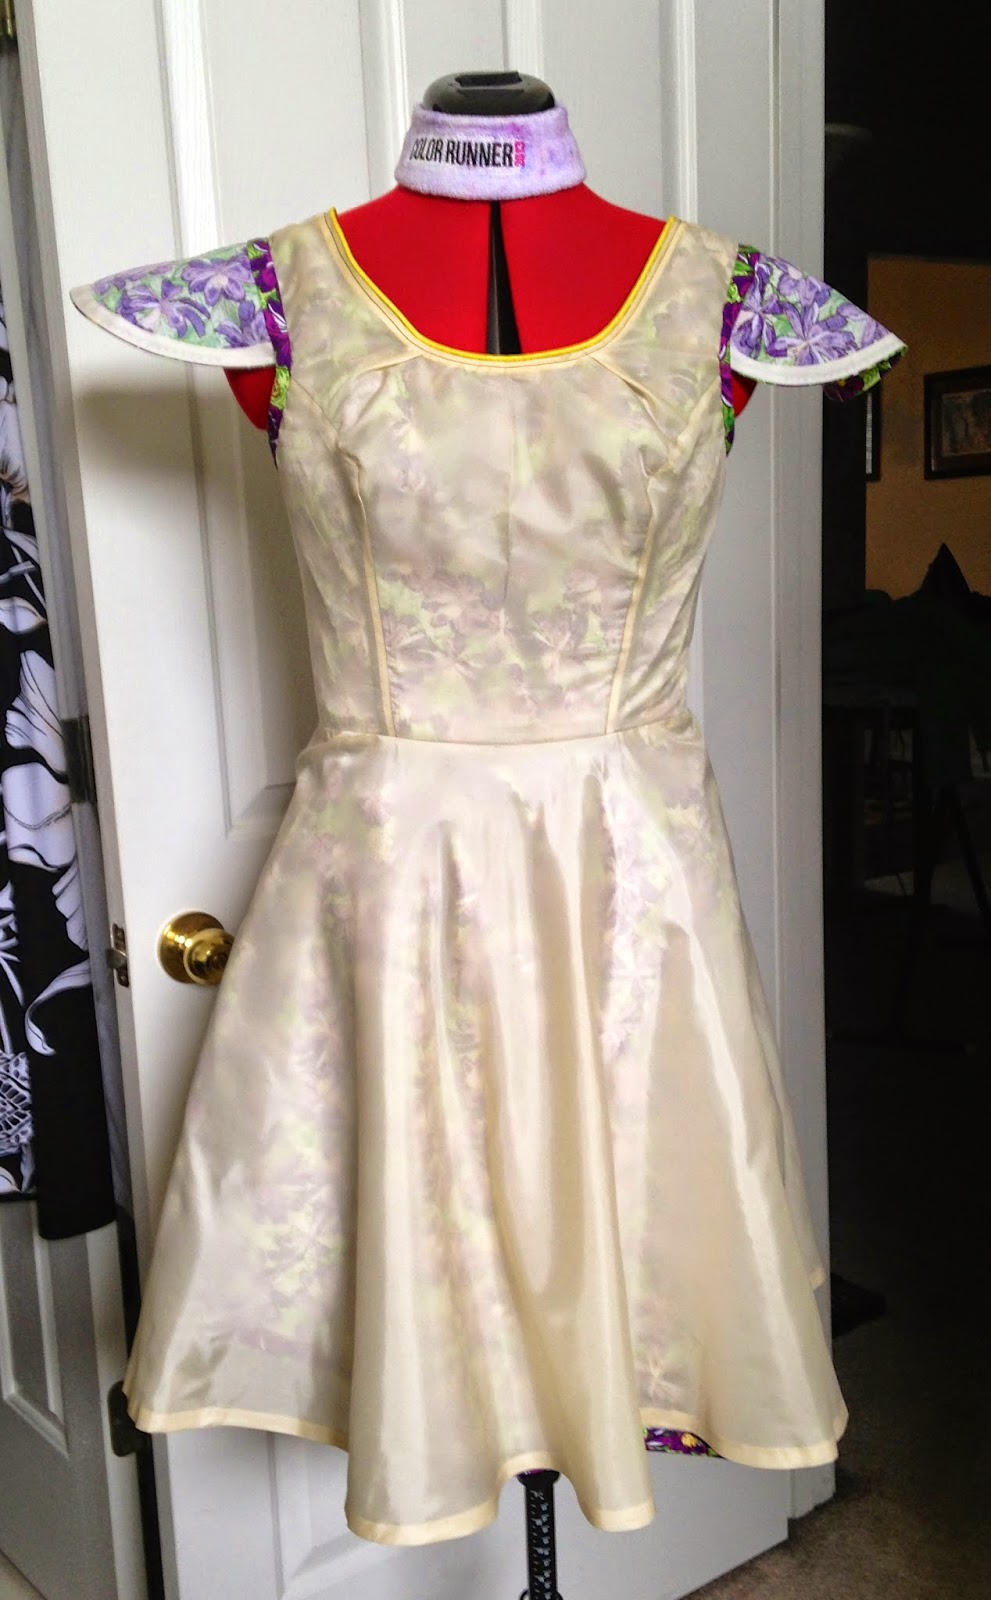
first up is the floral day dress, which was the first project of my Draping class.  i did yellow piping accents, pleats at the neckline, a little flutter sleeve with bias tape hemming, hand sewn buttonhole for the back strap.  it is fully lined (minus the sleeve piece) and i did a bias tape faced hem with bias tape i made myself.


next is the final dress i made for my Silk Embroidery class.  i completely sewed the dress and did all the embroidery myself.  we even had to add "embroidery" to a coordinating hat.


now for the project that was the real pain.  this 1950s inspired evening gown was the final for my Draping class.  we had free reign of what we wanted to do, so of course i had to go with my 1950s! lol  for my gown i did a sweetheart neckline bodice from yellow satin, then i did an overlay of yellow ruched chiffon (which i painstakingly ruched myself).  on the front bodice i started the chiffon so that it would hit right under the bust.  the bodice is also fully lined and has boning.  the skirt portion is intense.  i cut two full circles from the satin, then the chiffon i cut 4 full circles.  i wanted it to be full!! lol  i also added 4 layers of tulle, and did a lining.  i made the gown to fit myself, but my gown ended up being chosen to be part of the school fashion show so i ended up having to make my gown fit a size 2!  let me tell ya, i'm no where near a 2!! lol  luckily my teacher helped me in figuring out how to tack it in so the bodice fit.  and i must say the gown looked fantastic going down the runway!


once the semester was over i was so happy! it was great to finally get some sleep after that gown!  next up on my sewing to-do list though, was sewing my bridesmaid dress for my best friend's wedding in June.  she let all of us bridesmaids have different style dresses, as long the color was plum, and she even said i could make mine!  for the dress i used Simplicity 2442.  the upper portion ended up being a tad big, but at least the dress looked good on!  i used a plum satin and lined the bodice with a purple pongee lining.


i had a few other random sewing projects i did for myself after my dress, but the final one for this post is a duffle bag i made myself.  my mom and i went to Las Vegas with family in August, and i needed a bag that i could use as a carryon.  i found a great tutorial online on how to make the style bag i was looking for, then i just substituted my desired measurements.  the fabric was a quilted cotton i found at Joann's.  for the straps i used the opposite side of the fabric.  since the bag is soft it was perfect as a carryon, it just squished right into the overhead, and was big enough for taking clothes for 5 days!

so that's some of what i was up to this summer!  i'll try not to neglect y'all as much anymore.  until next time!

Thursday, March 20, 2014

Baby Silk Embroidery - Simplicity 2392

One of the classes I am taking this semester is Silk Embroidery.  I've dabbled in regular hand embroidery a few times and absolutely love it, so when the opportunity came up to take this class in place of another one that was cancelled I was excited.  For those of you who may not know what silk embroidery is here is how it is different form regular embroidery:

while regular embroidery typically uses cotton thread,

silk embroidery is done with 100% silk ribbon.
You even do the same stitches as you would in regular embroidery, but of course the size of the ribbon is what makes the stitches have a different look.  Silk ribbon embroidery is used a lot for doing floral motifs on things since the thickness of the ribbon gives good texture.

Now that you know a little about silk ribbon embroidery, back to the project!  The first project we were assigned for the silk embroidery class was a child garment.  No particular style or requirement for the garment, except that we did the embroidery on it and add lace somehow.  As soon as I saw this vintage pattern reprint from Simplicity I knew I had to use it for this project.  The feel of the embroidery just fits so well with the dress style.
I chose to sew up view B (the pink and white) but did the sleeve from view C.  


The embroidery I did on the front yoke of the dress is similar in layout and style to the embroidery idea they include in the pattern instructions.  I did a twisted/stem stitch for the flower stems, la daisy stitch for the flower petals, knots of r the flower centers, and ribbon stitch for the leaves.  I was still figuring out the twisted/stem stitch so the stems on these flowers look a little wonky.

 The part of the embroidery I did change was the embroidery on the bottom band.  Instead of the small flowers they did I wanted to make it look like the flowers were growing out of the hem of the dress.  I did all the same stitches as on the yoke, just bigger :)  and the twisted/stem stitch looks A QUADRILLION TIMES BETTER!  Ok, slight exaggeration there...but they do look so much better.  I was finally getting the hang of it.

And here are just a couple more pictures of the rest of the dress.  The armholes are faced, and the pattern even includes a piece to make the bias tape for them!  For the back yoke I chose two button that have a rainbow effect iridescence to them.

I am so pleased with how this dress turned out!  It is so adorable!  I even considered at one point selling it, but it's too cute to give away and plus I can save it for my future little girl...3, 4, 6 years down the road! lol

Wednesday, May 29, 2013

The Perfect Double-Sided Purse

i feel like i am always on the hunt for the perfect purse.  one that is not too big, but not too small to be used as an everyday purse.  it was during my conquest i stumbled upon this purse pattern on where else, Pinterest.  the link took me to the blog for Warehouse Fabrics.  the blog entry features a great tutorial for a roomy pleated purse.

their version of the purse

upon seeing this purse i knew i had to make it because it was exactly what i was looking for.  so i went through my fabric stashes to see what fabrics i had enough of to use for the purse.  in the end, the only things i spent money on for this purse were the webbing straps and the magnetic snap closure.  my kind of project!

for my version of the purse, i used denim on one side and a fun printed cotton on the other.  the denim piece i used was the bottom leg portion of a pair of jeans i cut up a while ago to make a denim skirt.  i cut it open on one side and laid the pattern piece on top and cut.  


i had also been wanting to try my hand at embroidery for a while now, so i decided to embroider the denim side.  as far as the embroidery design, i knew i wanted to do something simple and fun that went with the other side of the purse.  so i chose to do some flowers, swirls, and polka dots.  i used lime green, teal, yellow, and white embroidery floss.  to make the two big flowers i simply traced a flower sticker i have.  everything else was freehanded.  also, i meant to embroider the piece before i ironed the interfacing onto the back of it so that it would be a little more flimsy while trying to hold it, but i forgot. i was still able to embroider it with the interfacing on the back, though.  i also serged around the edges of the denim to prevent fraying as i was handling it.


this is what the denim piece looked like once i finished the embroidery.  i did a simple running stitch because i liked the look of it the most, and also because this was my first time embroidering anything.


once i had the embroidery done it was construction time!  i added teal piping around the top band but didn't ad it around the body of the purse since my version has two different sides. i figured the body of the bag was already interesting enough.  for my straps i simply went to Hancock Fabrics and bought enough webbing off the roll to make two straps.  one thing i do wish i had done differently was put the straps in a little further form the sides of the purse.


another change i made was in attaching the inside pockets.  in the blog they attached the divided pocket and flap pocket once they had already pleated the lining pieces.  i wanted the lining pieces to be able to fan out to fit the outer layers, so i attached the pockets onto the flat lining pieces THEN pleated them.


this was my first time inserting a magnetic snap, but it is DEFINITELY not my last.  i didn't realize how easy they were to install!  my next project i'm going to use one on is for a wallet i keep saying i'm going to make to go with my new purse (keywords "going to", but i AM the queen of procrastination).


once that was done it was time to attach the lining and outside together and flip it.  after i flipped it and closed the opening i topstitched around the top of the purse.


and ta-da!  the finished product.  i absolutely love my new purse and switched everything over to this one as soon as i was finished with it.  now i just need to get around to making the wallet i want.