Well y'all, I know, I've let you down and slacked on my blog again. With school, and working on my senior thesis collection, and work it was tough to keep up with the blog. Well, good thing is...school's out! And by out, I mean...I graduated this past May!!!
This was my second Bachelor's degree, my first being in Spanish, and I am so happy I went down this path! I met some great people, made some amazing friendships, and was able to let my creativity blossom. I wasn't able to do much sewing for myself over this past year because I was working on my 10-piece senior thesis collection. My passion is childrenswear, so for my collection I did a line for little girls based on 1960s Mod. The name of the line is MODern Rags. For our collection we did everything! From target market research to creating mood boards to making initial sketches to presenting our entire collection to a panel of judges big in the Nashville fashion industry to showcasing the collection on a runway at our New York-style school fashion show! Boy am I glad it's all over though!
Well, now that the show is over and I'm all graduated and things there is one more step left. I have to fulfill my internship requirement. One thing I love about O'More is that they REQUIRE you to have an internship before you can fully get your diploma. I love this because then we are going to have that industry experience!
Well let me tell ya, finding an internship was not easy! I really wanted to find an internship in childrenswear since that is ultimately where I want to be, but eventually I just started applying for internships. 24 to be exact! I was beginning to get discouraged, too, because I kept getting rejections, but I kept praying about it and trusting that things were going to work out in God's timing. Well, I did end up hearing back from one company, and I even made it to the video interview round! A few days after the final process I received the email that I didn't get the position with them. But talk about God's timing! A few days after receiving that rejection email I received another email saying that they had a new intern position open up and they immediately offered me that position!! I couldn't believe my eyes as I was reading that email! So, just like that I became a Nordstrom intern! What's even more exciting is that I will be moving across the US to Seattle for 10 weeks! This will be my first time ever going to the pacific northwest! Y'all, to say that I am excited about this new journey is an understatement! I can't wait to learn the ins-and-outs of Nordstrom as I work in their Product Development department, to explore another side of the country, and to discover more about myself. To make this journey even more epic, my mom and I are going to drive out to Seattle. Yes, I said we are going to DRIVE! My main reason for driving is to have experiences and go to places I've always wanted to go to; such as the St. Louis Arch and Mount Rushmore. If you want to stay up-to-date on my road trip and my time in Seattle, feel free to follow me on Instagram!
That's all for now, but I'll try and check back in during my internship as I begin to explore Seattle!
Oh, P.S.! I also started my own babywear line, Mini Moppets Babywear! It started with me making baby onesies, but now I have also started making baby infinity knot headbands...and you can also find all the pieces from my junior collection, Lil' Miss RockaBetty, in the Etsy shop!
Friday, June 3, 2016
Thursday, June 11, 2015
The Grass IS Greener On The Other Side
We made it to the end of our week-long New York trip. While I was ready to head back home, a week was not long enough to see everything we wanted to see.

This trip was awesome though, and it was great to have that perspective into the fashion industry while we were there, instead of just being regular tourists. While I honestly don't know if I could see myself living in New York, it was great to meet those industry professionals and make connections with them.
Our flight wasn't supposed to leave New York until 7-ish that evening, so a group of friends and I walked to some of the fabric stores near our hotel and looked to grab a bite to eat. For lunch we stopped at this great diner, Tick Tock.
Majority of the group got hamburgers and some sort of sandwich, but I decided to get their famous Disco Fries. This dish consisted of fries topped with brown gravy and mozzarella cheese. They were so good! Just thinking about them now as I'm typing this makes me want some!
All-in-all, I'm so glad I was able to go on the trip, but it certainly is nice to be back home! Sleep in my own bed. Inhale fresh air. See green grass. Being in New York, you never realize how industrial it is and their lack of grass and trees.
So, It's goodbye to New York, but who knows, maybe one day I'll find myself back there.
Thanks for stopping by and I hope y'all enjoyed reading about my adventures in New York!
Wednesday, June 10, 2015
Ay, Frida!
Well, we finished up meetings Wednesday and Thursday was a free day until dinner that evening.
Some friends and I decided to go out exploring together and our first stop was Mood Fabrics! Since I'm creating my senior collection this coming school year I was on the hunt for fabrics for that. Luckily, I already knew what aesthetic I wanted and also what fabrics I was looking for. Thankfully I found all the wools I wanted there, and my friend Naja was kind enough to let me use her suitcase to get them back home!

After Mood, we dropped our Mood purchases off back at the hotel and headed to our next adventure.
Earlier in the week, we saw an advertisement for a Frida Kahlo exhibit at the New York Botanical Garden. We hopped on the subway and headed out to the Bronx!

For this exhibit, the Botanical Garden recreated Frida's garden that she enjoyed at her home with Diego Rivera. Stepping into the conservatory was like stepping into Frida's Casa Azul. It was absolutely beautiful!
So yeah, now it's time for picture overload of all the beautiful flora and interesting cacti in La Casa Azul.


They even had a replica of Frida's artist workspace.

In the Botanical Library, they had quite a few of Frida Kahlo's artworks on display. Of course since they were the originals we could not take pictures of them. They were so amazing to look at, though.
Down on the 3rd floor of the Botanical Library, they had a magnificent paper replica of Frida's The Two Fridas piece. The details in this piece were amazing!


There was beautiful flora everywhere on the garden grounds. I especially loved these flower balls. Yes, they grew like that naturally!

After exiting the library, we headed back around front to enjoy some authentic Mexican food at the taco truck they had.

And let me tell you, these were THE BEST fish tacos I'd ever had! I could've eaten 10 more. Well, maybe not that many, but close!

Now about this trip back to our hotel in Manhattan!
You know how you get to a place one way, then you think, well maybe we can get back in a quicker route? Well, that was not the case in our journey back to the subway. We decided to go to a different station, but didn't even end up a that station. We walked for what seemed like hours, somehow missed the subway stop, and instead found the train. Once on the train we discovered that you really should buy your tickets before you get on, because we ended up paying $13 a piece for a train ticket! At least we were headed in the right direction. Our stop was Grand Central Station, and from there we transferred to the subway...but not before we had to hike up multiple thigh-killing, soul-shattering sets of stairs!
We finally did make it back to the hotel, but we had to scramble and get changed for dinner and the theater that evening! Our plan was to take a cab to the restaurant we were meeting at, but trying to hail a cab in rush hour clearly did not work out...and we ended up walking/speed-walking/crawling the 11 blocks to the restaurant. We all were so over walking and stairs by the time we sat down for dinner.
The shining light at the end of all the walking, though, was going to see The Lion King on Broadway!
I had only seen Hairspray on Broadway before so I was excited to see another play. The Lion King was ab-so-lute-ly amazing!! The opening and ending gave me chills. The costumes were stupendous and the singing was glorious!

Of course we couldn't take pictures of the show, but they did have costumes on display outside in the halls.


6 days in New York conquered! Come back tomorrow for a final good bye from New York and hear how Friday was!
Tuesday, June 9, 2015
Open Spaces & Hats For All Occasions
Our final day of meetings. Our first stop Wednesday morning was at the Calvin Klein flagship store.
Now, this is not your typical Calvin Klein store. This is pretty much a showroom, and they house their black label runway collections here. This particular space used to be a bank but once inside there is no evidence of that. All the walls are stark white and there is hardly any furniture in there. That way, the clothing and accessories can be the stars.


They have some cool pieces there in the store.

On the lower level is home goods. Calvin Klein manufactures their own home soft goods, meaning they have all their sheets, blankets, etc specifically made for them. They can also upholster a piece of furniture for you in one of their fabrics or any fabric of your choosing.


These waffle towel sets were so amazingly soft!


It was fun seeing all the interesting fashions and innovative home pieces they had in the Calvin Klein flagship store. Upon leaving Calvin Klein our next stop was Susan van der Linde.
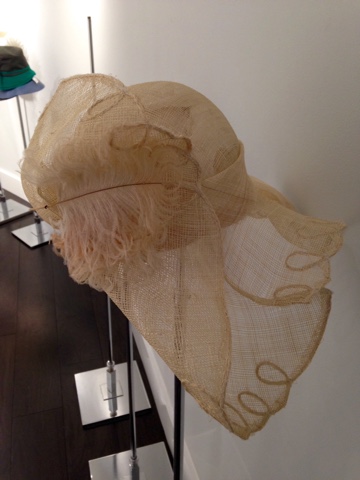
Susan van der Linde is a modern-day milliner in New York. Susan began her career by obtaining a prestigious apprenticeship and opened her own shop just when she thought she had lost all hope. This trip to Susan's store was so inspiring. She proved that if you believe and have faith everything will come out fine.

Susan hand-makes all her hats and fascinators in shop, along with a few other hired hat makers. The amount of detailing and quality to each piece is outstanding. That is why Susan has been so successful in her millinery business. Just from hearing Susan talk, you can hear the passion she has for her business, really her calling, and she stands wholeheartedly behind her products.


Susan said, luckily she married a man who was proficient in the business side of everything, and that is another thing that helps her stay established. She even said that her husband is the one who motivated her to get into making shoes.
Below, is a style of loafer she sells. I bet you think that shoe is so heavy. Well, it's not! That was the lightest weight loafer I have ever held! I would love to have a pair for myself, but unfortunately I don't have $425 to fork over.

At the end of our visit at Susan van der Linde, we each got to put on a hat or fascinator for a group picture in front of the store. While I'm not a hat person, this visit to Susan van der Linde New York was such a fun one!

After Susan van der Linde, we headed to PRPS Goods.
PRPS Goods is a men's jeans company in New York. It was started by Donwan Harrell after he began making jeans for himself as a hobby. PRPS Goods is not your average jeans company, though. This is more of a luxury jeans company. There are 3 sectors to PRPS jeans: 1)PRPS Goods, which is the least expensive but will still be at least $250, 2) PRPS, which utilizes Japanese and Zimbabwean cottons, and 3) PRPS Noir.
While all PRPS sectors are popular, PRPS Noir is what you will mainly see celebrities like Brad Pitt and David Beckham wearing. PRPS Goods can be found in high-end stores such as Bloomingdales.
Donwan is totally involved in every aspect of the jean making, and his inspiration in creating a pair of jeans is jeans from ye olde times. Donwan is an avid collector of vintage jeans, the ones that are hidden away in old attics or abandoned barns, and have a huge history behind them.
Below are a couple pictures of jeans from Donwan's collection. I loved seeing the techniques people used to mend the jeans, because of course these are from times when people didn't just simply go out and buy a new pair of jeans. Their jeans were made for work and they wore them until they simply couldn't anymore.


Donwan also taught us that when you see the white streaks on truly vintage denim, that's from the sun shining on it repeatedly wherever they were stuck.
For me, the visit to PRPS Goods was the most educational and interesting. I could've sat there and listened to Donwan talk all day. He has such a passion for denim and his processes. He is constantly inventing new distressing techniques and setting himself apart from the competition. Donwan is truly an artist when it comes to denim.
Our final meeting of the day AND of the trip was at Calypso St. Barth.
Calypso St. Barth is a women's clothing brand that has pieces that are comfortable, bohemian, and eclectic. The store base of Calypso may be a 3-floor warehouse, but when you walk into their main offices it's like taking breath of fresh air. There are windows everywhere and it's so bright!
I mean look at that wall behind their front desk!

Being in the main offices of Calypso you can just feel the creativity pulsing throughout.
At their lowest level is their on-site warehouse. They hold all the inventory for online orders and inventory that gets dispersed to stores. This floor is also where they set up displays. For each window set-up, they will do a mockup in the warehouse so they can cycle it through and see how it will function in store windows.
And look at the details on this jumpsuit!

Whew, we made it through all our meetings! That night we headed to dinner at Café Español.
Needless to say, at this point we were all exhausted from all the walking around New York we did. That did not stop Chelsea, Andrea, Hannah, and me from journeying out to the Bronx to visit the New York Botanical Garden the next day! See y'all tomorrow for some garden talk!
Subscribe to:
Posts (Atom)